
Creating Your First Worktree
A worktree in Band is a git worktree — an isolated copy of your repository with its own branch and working directory. Worktrees let coding agents work on features or fixes without touching your main branch or interfering with each other.
What are git worktrees?
Git worktrees are a built-in git feature that lets you check out multiple branches of the
same repository simultaneously, each in its own directory. Unlike cloning the repo multiple
times, worktrees share the same .git history, so they are fast to create and
use minimal disk space.
Band manages worktrees for you. When you create a worktree, Band creates a new branch, sets up a worktree directory, and runs any setup scripts defined in your repo configuration. When you remove a worktree, Band cleans up the branch and directory.
Create a worktree via the dashboard
- Open the Band dashboard and find your repo in the sidebar.
- Click the "+ New" button next to the repo name.
- Enter a branch name for the worktree (e.g.,
feat/auth). - Optionally pick a base branch to branch from (defaults to the repo's main branch).
- Optionally type an initial prompt — this will be sent to the coding agent as soon as the worktree is ready.
- Click Create.
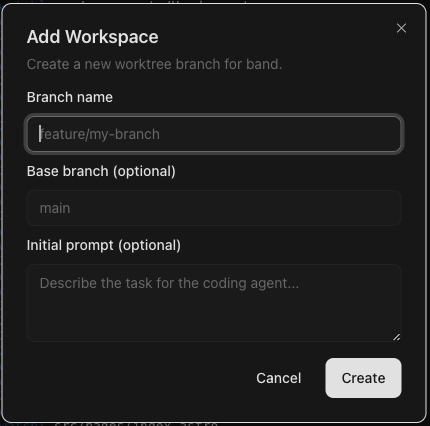
The worktree appears under the repo in the sidebar. You can click on it to view its details, including the worktree path, branch name, and any running tasks.
Create a worktree via the CLI
Use the band worktrees create command to create a worktree from your terminal:
band worktrees create my-app feat/login
This creates a new branch called feat/login in the my-app repo
and sets up a worktree directory for it. The command returns the path to the new worktree.
To branch from a specific base branch instead of the default:
band worktrees create my-app feat/login --base developYou can also create a worktree and immediately submit a task to start the agent working:
band worktrees create my-app feat/auth --prompt "Implement JWT authentication for the API"This is the recommended workflow for most cases — it creates the worktree and dispatches a task in a single step.
Setup scripts
If your repo contains a .band/config.json file with a setup
script, Band runs it automatically after creating the worktree. This is useful for
installing dependencies or performing other initialization:
{
  "setup": "npm install",
  "teardown": "rm -rf node_modules"
}
Setup scripts run inside the worktree directory. If a setup script fails, the worktree is still created — the failure is non-fatal and reported in the dashboard.
Worktree isolation
Each worktree is fully isolated. An agent working in one worktree cannot affect files in another worktree or on your main branch, so you can safely run multiple agents in parallel:
band worktrees create my-app feat/auth --prompt "Add authentication"
band worktrees create my-app feat/search --prompt "Add full-text search"
band worktrees create my-app fix/perf --prompt "Optimize database queries"
Listing and removing worktrees
To see all worktrees, or filter by repo:
band worktrees list
band worktrees list my-app
When you are done with a worktree, remove it to clean up the worktree directory and branch:
band worktrees remove my-app feat/loginNext step
Now that you have a worktree, learn how to run your first task and dispatch a prompt to a coding agent.