Workspace Management
Workspaces in Band are git worktree-based isolated environments for each branch you work on. Every workspace gets its own directory on disk with a full copy of the repository at the specified branch, allowing you to work on multiple branches simultaneously without switching contexts.
Creating Workspaces
You can create a new workspace from the dashboard or the CLI. Each workspace corresponds to a git worktree branch.
From the Dashboard
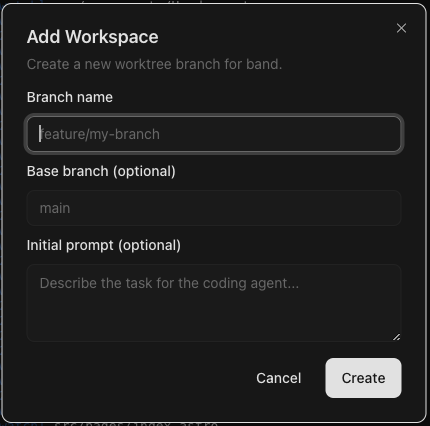
Click the + button next to a project name. A dialog appears with three fields:
- Branch name — The name of the new branch (e.g.,
feature/auth). - Base branch (optional) — The branch to base the new worktree on. Defaults to the project's default branch.
- Initial prompt (optional) — A task prompt for the coding agent. If provided, the agent starts working immediately after workspace creation.
From the CLI
# Create workspace and start an agent task immediately
band workspaces create my-app feat/login --prompt "Implement login page"

# Create workspace without starting a task
band workspaces create my-app feat/experiment

# Create from a specific base branch
band workspaces create my-app feat/api --base develop
Workspace creation is idempotent — creating an existing workspace simply returns its path without duplicating anything.
Untracked file copying
A fresh worktree only contains files git knows about. Untracked files like
.env, local credential overrides, or IDE settings are absent by
default. Configure them to be copied from the project's main checkout into
every new worktree via either of two declarative sources at the project root:
-
.band/config.json::workspace.copyFiles— explicit list of paths (literals or globs). See Project Configuration. -
.worktreeinclude— gitignore-syntax patterns. Only files that match a pattern AND are gitignored are copied (Claude Code parity).
When both sources are present, the union is copied. Copies happen after
git worktree add and before the setup script runs,
so the setup script can read .env just like it can in the main
checkout. Missing source files are skipped with a warning.
Workspace List
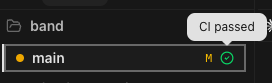
Workspaces appear nested under their parent project in the dashboard. Each workspace card displays:
- Branch name — The git branch this workspace tracks.
- Agent status indicator — A colored dot showing whether the coding agent is working or needs attention. See Agent Status.
- Setup status — Shows whether the setup script is running, completed, or failed.
- Git status — Indicates dirty files, unpushed commits, and sync state (ahead, behind, diverged).
- CI status — Shows the current CI pipeline state (pending, running, success, failure, cancelled, merged).
CI Status
Each workspace card shows a small icon next to the branch name reflecting the current GitHub Actions state for that branch. Hovering reveals a tooltip describing the state ("CI passed", "CI failed", and so on); clicking the icon opens the relevant pull request, workflow run, or check page on GitHub.
How CI status is resolved
Band reads CI state from GitHub Actions by calling
GitHub's GraphQL API through the gh CLI. For each registered
workspace branch it asks GitHub for:
- The most recent open or merged pull request on that branch.
- The check suites and workflow runs attached to the head commit.
If a branch has multiple workflows running, Band aggregates them and shows the most significant state — failure beats running beats pending beats cancelled beats success.
Only GitHub Actions workflows are surfaced. Third-party check providers (CircleCI, Buildkite, and so on) that report through the GitHub Checks API are filtered out.
Authentication
Band uses whatever credentials your gh CLI is configured with
— there is no separate token to configure inside Band. To enable CI
status, run:
gh auth login
Once gh auth status reports a successful login, Band starts
resolving CI state for branches in repositories you have access to. GitHub
Enterprise hosts work too — authenticate the matching hostname with
gh auth login --hostname <your-enterprise-host>.
If gh is not installed or not authenticated, Band leaves the
CI column empty rather than throwing an error.
States
- Pending — A workflow is queued but has not started yet.
- Running — A workflow is currently executing for the head commit.
- Success — All workflows for the head commit passed.
- Failure — At least one workflow failed.
- Cancelled — The most recent workflow run was cancelled.
- Merged — The branch's pull request has been merged. Not shown on the project's default branch.
- None — No workflows are configured, no commits have been pushed yet, or
ghis unavailable.
Opening a Workspace
Clicking a workspace opens it inside the dashboard. The active workspace is highlighted with a left border accent.
Removing Workspaces
You can remove a workspace from the context menu (right-click) or via the CLI:
band workspaces remove my-app feat/login
Before removal, Band runs the project's teardown script if one is defined in
.band/config.json. The teardown script is non-fatal — removal proceeds
even if it fails.
If the workspace has unmerged pull requests, dirty files, or unpushed commits, a confirmation dialog appears warning you about potential data loss. You must explicitly confirm deletion in these cases.
Workspace Context Menu
Right-clicking a workspace reveals additional actions:
- Copy path — Copy the worktree path to clipboard.
- Open in Finder — Reveal the worktree directory.
- Run setup — Manually re-run the setup script (only shown if a setup script is defined).
- Run teardown — Manually run the teardown script.
- Git pull — Pull the latest changes for this branch.
- Git push — Push local commits to the remote.
- Delete workspace — Remove the workspace and its worktree (not available for the default branch).
To review and commit pending changes inside a workspace, open the Changes view — it's the diff reviewer where per-file revert and the commit dialog live.
Naming Conventions
Workspace names are derived from their branch names. Band supports standard git branch
naming conventions including slashes for namespacing (e.g., feature/auth,
fix/bug-123). Branch names must not contain control characters or path
traversals (../).
Worktree directories are stored in the configured worktrees folder (default:
~/.band/worktrees), organized by project name and branch.